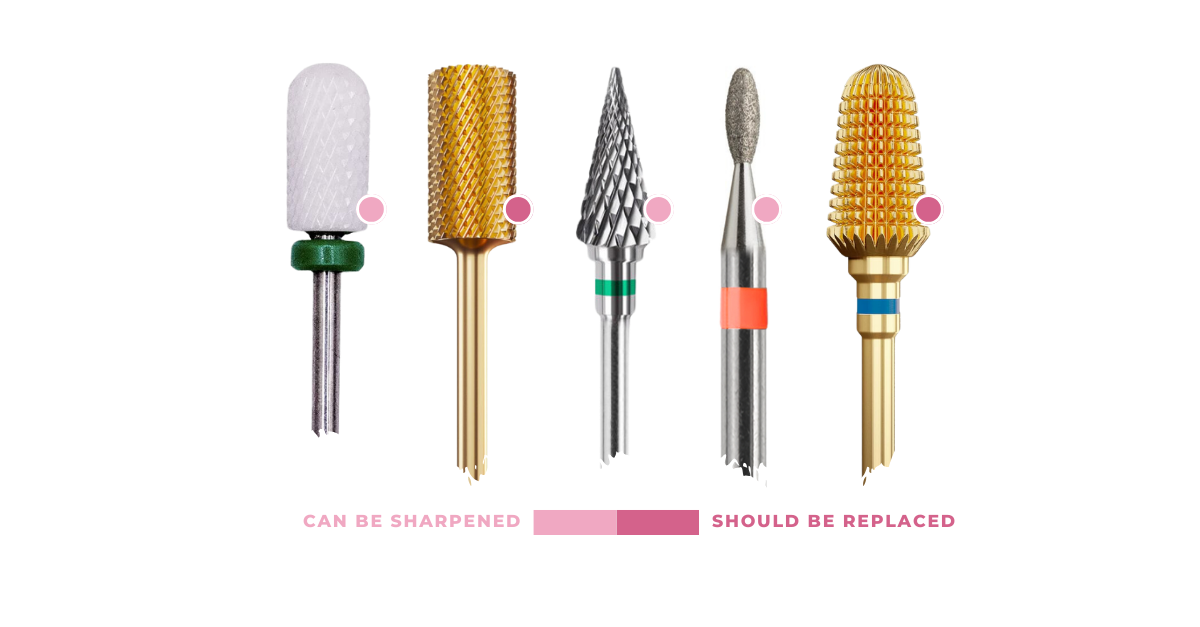
Not all bits can be sharpened. For example, carbide nail drill bits are highly durable and stay sharp for a long time; however, once dull, they should be replaced rather than sharpened. On the other hand, steel or diamond nail drill bits can be sharpened using a few simple techniques.
Dull bits?

No problem. Learn the ABCs of spotting, sharpening and when it’s time to say goodbye.
Nail that perfect manicure every time!
From acrylics to cuticles, we’ve got insider tips for your drill bit care.
Recognizing and Sharpening Dull Nail Drill Bits

Don’t let dull nail drill bits ruin your day (or your client’s manicure).
The tell-tale signs of a dull drill bit are reduced cutting performance and the inability to glide effortlessly through materials like acrylic or gel.
How to Identify Dull Nail Drill Bits
Before we begin, remember that keeping nail drill bits sharp is essential for smooth and efficient work.
When you come across rough or ragged surfaces while performing nail services, it might be an indicator that your bits have lost their edge.
Sharp drill bits will make clean cuts, while dull ones will cause more friction and heat, potentially damaging your client’s nails.
How to Clean Nail Drill Bits Before Sharpening
To ensure the best results when sharpening your bits, it’s vital to clean them beforehand. Proper cleaning of your drill bits not only increases their longevity but also helps to prevent cross-contamination between clients.
Here’s a quick step-by-step guide on cleaning your nail drill bits that you can follow.
With your nail drill bits cleaned, you can now sharpen them as needed.
Start by carefully examining their shape and condition. Identify areas that require sharpening and determine whether to use a file or a grinder.
Two crucial aspects of a well-sharpened bit are symmetric lips and a properly shaped chisel.
By focusing on these aspects and following the techniques mentioned in the provided resources, you’ll be able to efficiently elevate your practice with sharp, high-performing nail drill bits.
Remember, providing the best experience for your clients requires proficiency with the tools you use.
So, as a skilled nail technician, always be familiar with the different nail drill bits and their specific applications while ensuring your own set is in top-notch condition.
How To Sharpen Nail Drill Bits
As a nail enthusiast or technician, having sharp nail drill bits is essential for achieving the perfect manicure or pedicure.
In this section, we’ll explore how to sharpen nail drill bits, discuss which types can be sharpened, and ensure your safety at all times.
Sharpening Essentials: Techniques and Tools

When it comes to sharpening nail drill bits, not all bits can be sharpened. Carbide nail drill bits, for example, are highly durable and maintain their sharpness for a long time; however, once dull, they should be replaced rather than sharpened.
On the other hand, steel or diamond nail drill bits can be sharpened using a few easy techniques.
Step-by-Step Guide on How to Sharpen Your Nails Bits
Here’s a brief, practical guide to get you started:
- Clean the bit – Use a soft brush or cloth to remove debris and dust from your dull nail drill bit.
- Choose your tool – To sharpen steel bits, consider using fine-grit sandpaper or a nail file. For diamond bits, use a diamond sharpening plate or disc.
- Sharpen the cutting edges – Hold the bit at the appropriate angle against your sharpening tool (approximately 20-30 degrees). Make sure to maintain this angle while sharpening.
- Work in a consistent motion – Gently push the bit into the sharpening tool, moving it back and forth to ensure even sharpening. Rotate the bit after every few strokes to sharpen all sides.
- Test the sharpness on acrylic or practice nails.
- Repeat the process, if necessary, until the desired sharpness is achieved.
- Lubricate the bits with oil to keep them smooth and efficient.
- Store the bits properly in a dry and organized container.
Safety First: Sharpening Without Injuries
To ensure your safety while sharpening nail drill bits, follow these tips:
- Wear eye protection: When using a sharpening tool, tiny debris particles can fly off the bit. Protect your eyes with safety goggles.
- Secure the bit: If you’re using an automated sharpener, make sure to clamp your drill bit tightly, so it doesn’t slip or wobble.
- Take breaks: Overheating can damage the bit or your sharpening tool. Allow them to cool down periodically.
- Inspect your work: After sharpening, examine the bit to ensure there are no cracks or chips that could pose a safety hazard. If you find any, discard the bit and replace it with a new one.
With practice and care, you’ll become a pro at sharpening your nail drill bits.
Not only will this skill save you time and money, but it will also help you achieve flawless manicures and pedicures.
Deciding Between Sharpen and Replace
So, you’ve got some dull nail drill bits on your hands and you’re wondering whether to sharpen or replace them.
Sharpening can save you money but replacing them might save you time and effort. Let’s figure out what’s best for you, and your clients.
The type of material your nail drill bit is made from plays a huge role in deciding whether to sharpen or replace it.
Carbide bits are harder and last longer than diamond bits, but they can be sharpened less frequently. On the other hand, diamond bits can be sharpened more often, but their lifespan is shorter overall.
Here is a quick guide to help you decide based on the material:
| Material | Sharpen | Replace |
| Carbide | Less frequent | Longer lifespan |
| Diamond | More frequent | Shorter lifespan |
Maintaining your nail drill bits involves more than just sharpening. Remember to clean and disinfect them regularly and replace bits with chipped or damaged surfaces that can no longer be sharpened.
Proper maintenance will ensure your tools are always in optimal condition, providing the best nail services to your loyal clients.
Safety first, my fellow nail enthusiasts! When sharpening your nail drill bits, ensure you’re following these safety guidelines to avoid any unwanted injuries:
- Use a sharpening tool or device specifically designed for nail drill bits.
- Wear eye protection and a mask to prevent inhaling any dust or debris.
- Ensure the drill bit is securely held in place while you’re sharpening it.
- Always sharpen your bits in a well-ventilated area away from flammable materials.
Consider the type of nail drill bit material and the condition it is in before deciding to sharpen or replace it.
Maintenance Tips for Nail Drill Bits

Best Practices to Keep Drill Bits Sharp
It’s important to keep your nail drill bits sharp to ensure efficiency and a professional finish during nail services. Here are some maintenance tips to keep your bits in tip-top shape:
1. Clean regularly: After each use, make sure to clean your drill bits to remove any nail dust or debris. Use a soft brush, like a toothbrush, and gently scrub the bits.
This will prevent residue build-up and help maintain their sharpness. For more robust cleaning methods, consider soaking your bits in a disinfectant solution for a few minutes.
2. Dry completely: To avoid rust and corrosion, it’s essential to let your nail bits dry entirely after cleaning. Wipe them with a dry cloth and place them on a towel to air dry. Proper drying helps preserve the sharpness while also prolonging their lifespan.
3. Store safely: Once your drill bits are clean and dry, store them in their designated container or organizer. This will protect them from damage and ensure they remain sharp and ready for their next use
Advanced Care on Protecting Your Nail Drill Bits
In addition to the fundamental maintenance steps, here are some advanced care tips to provide extra protection and extend the life of your nail drill bits:
- Invest in quality tools: Higher-quality nail bits tend to stay sharper longer. If possible, invest in a 5-in-1 nail drill bit that features multiple grits and sizes in one easy-to-use tool.
This versatile bit can save you time and energy while ensuring consistent sharpness.
- Monitor wear: Keep an eye on your drill bits’ performance and appearance. If they become dull, damaged, or chipped, replace them immediately.
Dull or damaged bits can lead to uneven nail services and may also pose safety risks.
- Rotation: Have multiple sets of drill bits to rotate regularly. This not only ensures that you always have sharp bits on hand but also helps extend the life of each set as they are not being overused.
By following these maintenance tips, you will ensure better performance and prolong the life of your nail drill bits, resulting in a more enjoyable experience for both you and your clients.
Frequently Asked Questions

What’s The Secret To Giving Nail Drill Bits A New Lease On Life Without Leaving My Salon?
Sharpening your nail drill bits can improve their performance and extend their lifespan. Invest in a good quality nail drill bits that includes a variety of shapes and sizes.
To give your bits a new lease on life, gently clean each bit with a brush or soft cloth after each use. Remember to store them properly in a dry and organized container to protect them from damage.
Is There A DIY Technique For Sharpening Nail Bits That’s Safe And Effective?
Yes, you can sharpen your nail bits at home by using a fine diamond file or a sharpening stone. Grasp the bit firmly and file it at a consistent angle to sharpen it.
Be gentle and careful, as applying too much pressure can damage the bit. Test the sharpness on a piece of acrylic or practice nails until it feels like new.
Make sure to follow proper safety precautions, such as wearing protective eyewear and working in a well-ventilated area.
After A Gazillion Uses, How Do I Get My Nail Bits To Feel Like New With Some At-Home TLC?
Getting your nail bits to feel like new again requires regular cleaning and maintenance. Soak your metal drill bits in a bowl of soapy warm water and scrub them with a brush to remove dirt and debris.
For a deeper clean, soak metal bits in acetone for 7-10 minutes. After cleaning and sharpening, lubricate your bits with a few drops of oil to keep them smooth and efficient.
Final Thoughts
Nail drill bits are an essential part of any nail technician’s toolkit.
With the right techniques and regular maintenance, you can keep them sharp and efficient, ensuring you always deliver top-notch service to your clients.
It’s time to take your nail game to the next level!
Share your thoughts or tips in the comments below, and don’t forget to spread the knowledge by sharing this post on your favorite social media platform!
