Ever wonder why brush shapers and restorers are a common sight in every nail salon? These little bottles of magic are designed to bring your unruly acrylic brushes back to their original glory. And it’s not rocket science either.
A well-shaped acrylic nail brush is crucial for nail technicians.

Neglecting maintenance can lead to uneven results.
Here’s our article on how to reshape acrylic nail brush, so that you’ll always have flawless nail art!
Understanding Acrylic Nail Brushes
Before diving into the process of reshaping your acrylic nail brush, let’s first understand what it’s made of.
Most high-quality acrylic brushes are made from Kolinsky sable hair, renowned for its durability, flexibility, and excellent liquid-holding capacity.
Just like a well-maintained, top-notch tool can significantly enhance your nail artistry, a poorly maintained one can equally wreak havoc on your designs.
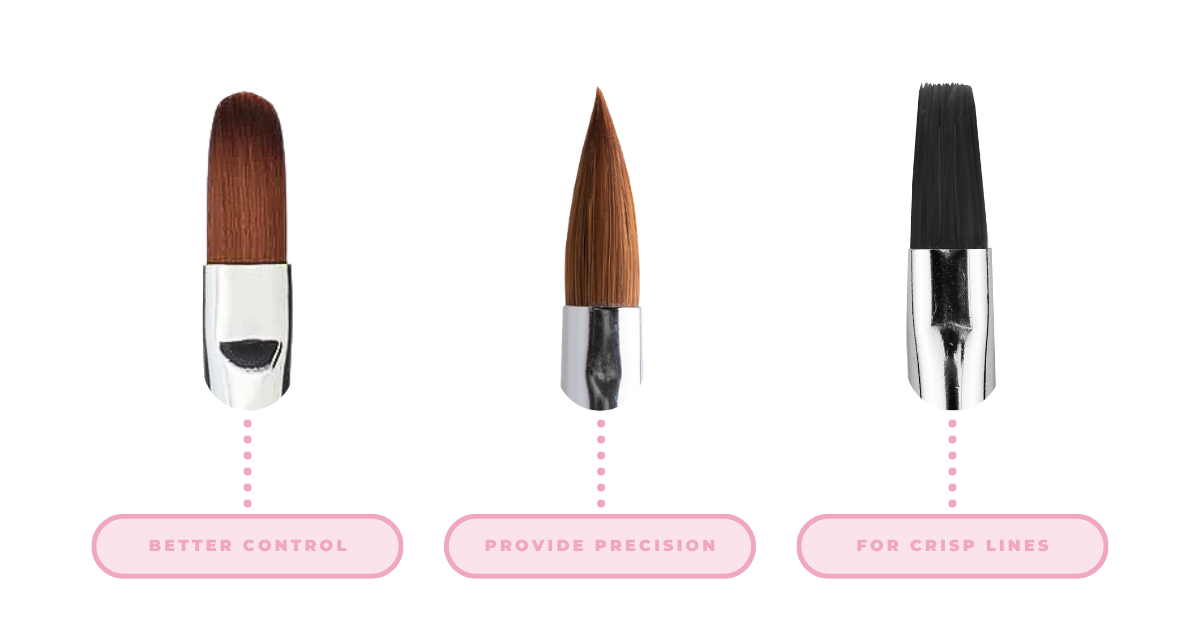
The shape of your acrylic nail brushes affect the flow and control of the acrylic product.
A round brush with a pointed tip provides precision. A flat brush, on the other hand, offers better control while applying the acrylic to the nail.
A square brush provides maximum control and is excellent for creating crisp smile lines.
Here’s an article you can read to understand more about the size and shapes of acrylic nail brushes.
Signs Your Acrylic Nail Brush Needs Reshaping
An acrylic nail brush in need of reshaping usually exhibits a few telltale signs. The bristles may fan out, preventing the brush from holding its shape.
Some bristles might be longer than others, causing an irregular brush shape, or the brush may not hold enough liquid to create beautiful, consistent acrylic beads.
Sound familiar? Then it’s time for a reshape!
Learn all the signs below:
Bent Bristles: The Red Flag You Shouldn’t Ignore

First things first, let’s unravel the mystery behind bent bristles. They’re the hairpin turns your acrylic nail brush starts taking, veering from its usual straight path.
It’s like a car making a sudden U-turn in the middle of a freeway- definitely not something you’d want!
So, what should you do if you spot bent bristles? It’s simple.
Your brush needs reshaping, and it needs it now.
Don’t let those curved culprits go unattended, my friends.
Like that crooked painting in your living room that’s been bugging you, it’s time to straighten things out.
Splayed Bristles: More Than Just a Messy Mane
Next on our list: splayed bristles. Think of them as the punk rockers of the bristle world – always wanting to stand out and do their own thing.
But your acrylic brush isn’t a mosh pit, and you need all those bristles working in harmony to create that perfect nail art.
Are you seeing bristles that refuse to play nice? It’s not just about aesthetics.
Splayed bristles are a sign that your brush isn’t performing at its best. It’s like a soccer team where every player is trying to score a goal on their own.
It’s time for some reshaping to get your team – I mean, brush – back on track.
Frayed or Split Bristles: The Uninvited Guests
Ever dealt with hair split ends? Annoying, aren’t they?
Now imagine those on your acrylic brushes. Yup, it’s just as frustrating. Frayed or split bristles are like those uninvited guests at your party who end up causing a ruckus.
They’re not only disrupting the flow but also making your job harder.
So, if you spot them, don’t just roll your eyes and continue. It’s time for a brush-reshaping intervention.
Show those party crashers the door, and let your acrylic brush be the star it deserves to be.
Why is Your Acrylic Brush Splitting?

Now that we’ve covered the signs, let’s tackle the big question – why is your acrylic brush splitting?
It’s like that annoying pothole that keeps appearing on your driveway. You fill it, and bam! It’s back again.
Most times, it’s about the quality of the brush, or it could be due to improper cleaning. Just like you wouldn’t use a dull knife to cut a steak, you shouldn’t use a splitting brush for your masterpieces.
It’s time for a little TLC for your acrylic brushes – clean it properly, reshape it, and it’ll be ready to roll again.
Remember, a brush in good shape is your best ally in creating stunning nail art. So, keep an eye out for those signs and act promptly.
Your acrylics will thank you!
Methods On How To Reshape Acrylic Nail Brush
Now let’s get down to the nitty-gritty: the reshaping process.
You can perform this magic with items you most likely already have in your salon.
You’ll need a brush cleaner, a towel, and your unruly brush.
Let’s dive right in, shall we?
Using a Brush Shaper or Brush Restorer

You know, there’s a reason tools like brush shapers and restorers exist – they’re tailor-made for this exact problem.
But how exactly do they work? You might ask. Well, they’re designed to condition the bristles of your brush back into their original shape.
Here’s how to use them:
1. Clean your brush: First things first, make sure your brush is clean. This should be a given, but you’d be surprised how many people skip this step.
2. Apply the brush shaper/restorer: Once clean, dip your brush into the shaper or restorer solution.
3. Reshape the bristles: Here’s where the magic happens, folks. Take your time to mold the bristles back into shape.
4. Let it dry: Let the solution do its work. Leave your brush to dry, and voilà!
Using Hot Water and a Paper Towel
You’re probably thinking, “Hot water and a paper towel? Really?” But trust me, this method works like a charm.
It’s simple, cost-effective, and can be done right at home.
Here’s what you need to do:
1. Boil some water: Just enough to submerge your brush.
2. Dip your brush: Once the water is hot, dip your brush in it for a few seconds.
3. Dry and reshape with a paper towel: Remove the brush from the water and gently dry it with a paper towel, reshaping the bristles as you do so.
4. Let it dry: Leave the brush to dry naturally.
Using a Brush Cleaner
Last, but certainly not least, is the brush cleaner method. It’s a tad more expensive than the hot water and paper towel method, but trust me, it’s worth every penny.
Here’s the step-by-step guide:
1. Clean your brush with the cleaner: Apply a few drops of the cleaner to your brush and work it into the bristles.
2. Rinse with warm water: Rinse the brush under warm water until all the cleaner is washed off.
3. Reshape the bristles: Gently mold the bristles back into shape.
4. Let it dry: As with the other methods, let the brush dry naturally.
How to Prevent Acrylic Nail Brush from Losing its Shape
A well-shaped, clean brush is not merely a tool. It’s a magic wand that unleashes your creativity.
It’s an extension of you!
And when you take good care of it, it pays you back with fantastic results.
Here are some pro tips on how to prevent nail brush from losing its shape:
1. Keeping Your Brush Clean and Happy
A clean brush is a happy brush! Regular cleaning after each use can prevent your brush from losing its shape. Bonus?
It also extends the lifespan of your brush. Here’s a comprehensive guide on how to clean your acrylic nail brush to help you out.
Now, if you’ve got dried nail acrylic stuck in your brush, don’t panic. There are several methods to clean it out without using acetone.
2. Preventing Brush Misshape: Regular Cleaning and Proper Storage
Cleaning your brush after each use is a surefire way to prevent it from losing its shape. And don’t forget to store your brush properly.
That means no leaving it out in the open where dust and debris can nestle in the bristles. A protective cover or case is your brush’s best friend!
3. Unleashing the Power of a Well-Maintained Brush
A well-shaped and clean brush can take your nail art to the next level. Remember, your brush is not just a tool, but an extension of your creativity.
So, take good care of it, and it will reward you with stunning nail designs.
Additional Tips and Techniques

As a nail technician, you know that your tools are just as important as your skills. Your acrylic brush, for instance, is a crucial ally in creating flawless nail designs.
But, like any other tool, it requires proper care to perform at its best.
Let’s dive into some expert tips and techniques to keep your acrylic brush in top-notch condition.
1. Flattening an Acrylic Brush: The Why and How
Ever dealt with a fanned-out acrylic brush that ruins your perfect strokes? It’s frustrating, right? The key to avoiding this is to flatten your brush properly.
To flatten an acrylic brush, dip it into your liquid monomer, and then gently press it onto a clean paper towel.
This process helps to expel excess liquid and reshapes the brush to its original flat shape. Remember, a flat brush equals smooth applications and satisfied clients!
2. Maintaining the Shape of Your Acrylic Brush: It’s Easier Than You Think
Keeping your acrylic brush in shape is as essential as keeping it clean. A misshapen brush can make your work look sloppy and unprofessional.
After using your brush, make sure to clean it thoroughly with your brush cleaner. Then, shape it back to its original form using your fingers or a shaping tool.
A little bit of care can go a long way in extending the lifespan of your brush and ensuring consistency in your work.
3. Straightening Bristles on a Nail Brush: A Game-Changer
Ever noticed those annoying bent bristles on your nail brush? They’re a nightmare, especially when you’re working on intricate designs.
To straighten the bristles, immerse your brush in hot (but not boiling) water for a couple of minutes. Then, gently reshape the bristles using a comb or your fingers.
Just be careful not to pull too hard – you don’t want to lose any precious bristles!
Final Thoughts

Reshaping your brush takes patience; practice makes perfect!
Take the time to care for your acrylic brush to achieve top-notch results.
Share your thoughts or experiences below and help others perfect their nail art game.
